
DIY Headboard
For the longest time, I didn't have a headboard in my room. I just couldn't afford to pay for a new one, and any used ones were too "used" or in poor condition. I found some inspiration from Pinterest and got to work with Zach.

We got to work with 5 pieces of wood (yes I know there's only 4 here, but one was already moved to our work area..aka the kitchen table:)

See! It's right here :)
We bought the wood at our local Home Depot along with the other materials you will need for the headboard:
1. 14 #8 x 2" screws. (Philips head)
2. Stain in the shade of your choice. The smallest size is more than enough.
3. 8 Tie Plates

4. 2 Heavy Duty Ring Hangers

Once we had all of our supplies, we began staining the wood.

If you want your wood to look a little "tattered" or "beaten", then literally beat it! :D Just take it outside and throw some rocks, screwdrivers, anything you want to make it dent in and cause a little damage :)
We carved little hearts as if we were carving into a tree, and we carved in the date we made the headboard and our initials.

We continued to stain all the pieces and the stain dries fairly quickly.
Once it dried completely, we laid out the wood how I wanted the wood to look when it was all put together. We then flipped the wood over (face down/stain down) and laid the tie plates down and screwed them in to hold them all in place.


Once those were screwed in place, we had to screw in the hooks in order to hang it on the wall! :)

The most difficult part of this task was making sure the hooks were close to perfectly level. But! It was no match for me and Zach :)
After everything was secure, we turned it back over and took our yellow paint, the same paint we used for the bird on my vanity and I had Zach outline the word "LOVE" on the wood with pencil, and I followed it up with the paint :)


Once the paint dried, we went to hang it in my room! All that was left was a little decorating.


And here's the finished product! :)
It was so much fun to make and it took probably an hour to 2 hours at the most. It was simple, fast, and it makes such a HUGE difference to my room. :)


 We just had our spring break trip and we used an original disposable camera and just got them developed. The pictures were of course not as good of quality as using our new cameras or phones, but going back to the old disposable camera was really fun :)


Crayola Fun

My apartment is covered in white walls and is far from homey. After months of living here, (I know, why did I wait?!) I couldn't take it any more and started to decorate to the best of my ability....and budget.
Zach and I went to Micheal's Arts and Crafts store and bought the 2 following items:
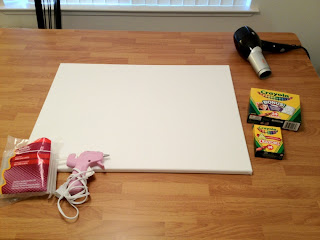
1. A basic canvas, what ever size you would like to hang
2. One large box of Crayola crayons and a smaller one (in case we wanted to double up on any colors we really liked)

I already owned a hair dryer and hot glue with extra glue sticks, but if necessary, buy them when you purchase the canvas and crayons. You don't HAVE to use crayola crayons, any crayon will work.
The idea of this project was to do something fast, easy, fun, and decorative to help liven up the lifeless living room which we currently reside. Let's get started!
The first step is to lay out the canvas on a flat surface with some towels or newspaper underneath so you don't drip crayon wax on your table or work area. This takes a very small amount of space so no need to worry where you are, as long as you have an outlet near by.
Next, pick out the colors you wish to have on your canvas. We stuck with earthy tones because we're slowly incorporating those colors into the living area.

We laid them out in the order we wanted before gluing. Just in case there were any changes we wanted or needed to make. We doubled up on colors that we really liked or wanted to emphasize. NOTE. We did NOT cover the entire canvas. You do not need to fully cover the width of the canvas if you do not wish to. The color will cover the entire surface regardless.
We began gluing!


The process took awhile because we only had one glue gun and it was difficult to make sure the crayons were even (ended up being a small factor in the end anyway, so don't stress). The best way to lay them down evenly (after trial and error) was to match up the CRAYOLA logo on each crayon. Just a helpful hint :)


The product should look something like this once you're all done gluing.

After gluing comes the fun part.
Take your hair dryer and begin to melt the crayons so they drip down the canvas. We turned ours on low for awhile, but it took a little long to fully melt the crayons. We turned up the hair dryer to high and the crayons melted a lot quicker, but also began to splatter because of the wind (at least a certain angles). The best way for us was to go from the top, watch a certain section of crayons melt fully, then follow the drips down to the desired length. The wax comes off though, so don't panic if you get it on your walls or tile/hardwood floors.

Next thing you know, you have your finished product!

Hope this was helpful to anyone who wanted to try this at home!
It's quick, easy, and very fun.
Bulletin Board
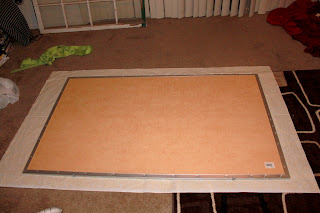
Today we figured out what to do with the GIANT bulletin board my friend gave me. We had no idea what to do with such a big cork board, so after a little thinking and swapping of ideas. We came up with a quick, simple, cheap solution to help decorate and still have a useful bulletin board. The walls in my apartment are white and we're not allowed to paint, so we've hung things around the apartment, but nothing compares to a bright, happy color on the walls of your home.
 |
Before
|
We went to our local JoAnn's Fabrics and picked up a bright, yellow fabric with white flowers.
 | ||||
The lighting and flash make it look more dark/mustard-y, but it's a pretty, delicate yellow ( I promise:) )
|
We bought a simple green ribbon to border the fabric and this is how the process began :)
First, we laid down the fabric, face down, then we laid the bulletin board on top, face down as well.

The fabric stuck out a little far on the edges so we cut it down to make it easier to secure down.

We picked up a Fabric tape from JoAnn's and started using it, but Duct Tape would work just as well. But we soon ran out and used hot glue.


The hot glue just as well and didn't show through. But, be sure to leave enough to wrap over the edge.

The hot glue dries fast so it was a team effort to glue down the fabric, but it wasn't difficult at all.
Next came the border. All we did was cut the ribbon a little longer than the length of the board, just long enough to wrap over the board slightly.


Lucky for us, our cork board had built-in hooks. We wrapped the fabric around it and then cut out small holes around the hooks.


Last step, hang it on your wall and decorate!

 We just had our spring break trip and we used an original disposable camera and just got them developed. The pictures were of course not as good of quality as using our new cameras or phones, but going back to the old disposable camera was really fun :)
We just added a few that we picked out real quick and began decorating.


The final product (for now):

It still needs a little work but it is WAY better than what it was before :)
 |
Before
|
 |
After
|
It's perfect for posting pictures, recipes, to-do lists, calendars, grocery lists, meal planners, etc. :)
Bulletin board: Free (gift from friend)
Yellow Fabric (2 yards): $6.99/yard (a little on the expensive side, but there are PLENTY to choose from, this one just happened to be it for us)
Green Ribbon (8 yards): $1.49/yard (again, a little expensive, but perfect shading for our project)
Pictures: Priceless :)
Total: Around $25.00 without tax.
Vanity Restoration
So we began with two separate pieces. The bottom half of the vanity was a gift from my mom and the mirror that we restored was a find on Craigslist. Here is the mirror originally.

 |
Original paint on the mirror. (NOT pretty.)
|
The mirror was a tan/wood color with silver metal in the center. On the inside was an etched design with gold paint outlining it. We decided it needed a little help.
We (okay, Zach did all the work for this part) took masking tape and covered the metal in the center, then lightly took a knife and carved off the extra tape that wasn't needed.


Then we slowly peeled off the tape that was previously cut.
While Zach was cutting and peeling, I was taking off the ugly gold paint on the inside of the mirror to make the etching less noticeable. All I did was use nail polish removed and a paper towel. It worked perfectly fine. NOTE: If you are wearing nail polish, it WILL take it off. I didn't think of that when we started :(

After that, we got painting. It was a basic white color to (attempt to) match the original vanity.

Once the paint was dry, which took less time than we thought, we decided that the mirror needed a little something else. We printed out a bird off of Google and cut out the center to make it a stencil. Then added tape underneath to get it to stay on the mirror


It ended up being too big as a square so we cut it down to look like this

Then we taped it to the mirror and got painting. I chose a yellow color because it is the new color I want to bring into my room.


Cleaned up around the outside with Q-Tips and paper towels

Then cleaned the mirror with Windex, added lights from Home Depot, and a couple things to the desk, my chair, and voila! My new vanity! :)

No comments:
Post a Comment